Monday, February 4, 2013

Getting my Skinny On!

I swore I would never wear skinny jeans. I used to be the same way about three quarter length sleeves. I don't know why I'm such a weirdo! Mom, this is my formal apology for how hard it was to buy clothes for me growing up :)

Well, I got sucked in about a year ago and now I have 1 pair of skinny jeans and I wear them every day! I'm obsessed with them. I found a tutorial on Pinterest to change bootcut jeans into skinny jeans and I knew I had to give it a go to make take my collection from 1 pair to 2! I had an old pair of dark wash jeans that were too short. They looked OK without shoes on but with shoes they were that pants tucked into your underwear kind of awkward.

Here's my victim:


See how they just barely touch the floor with socks on? Time to take care of that!

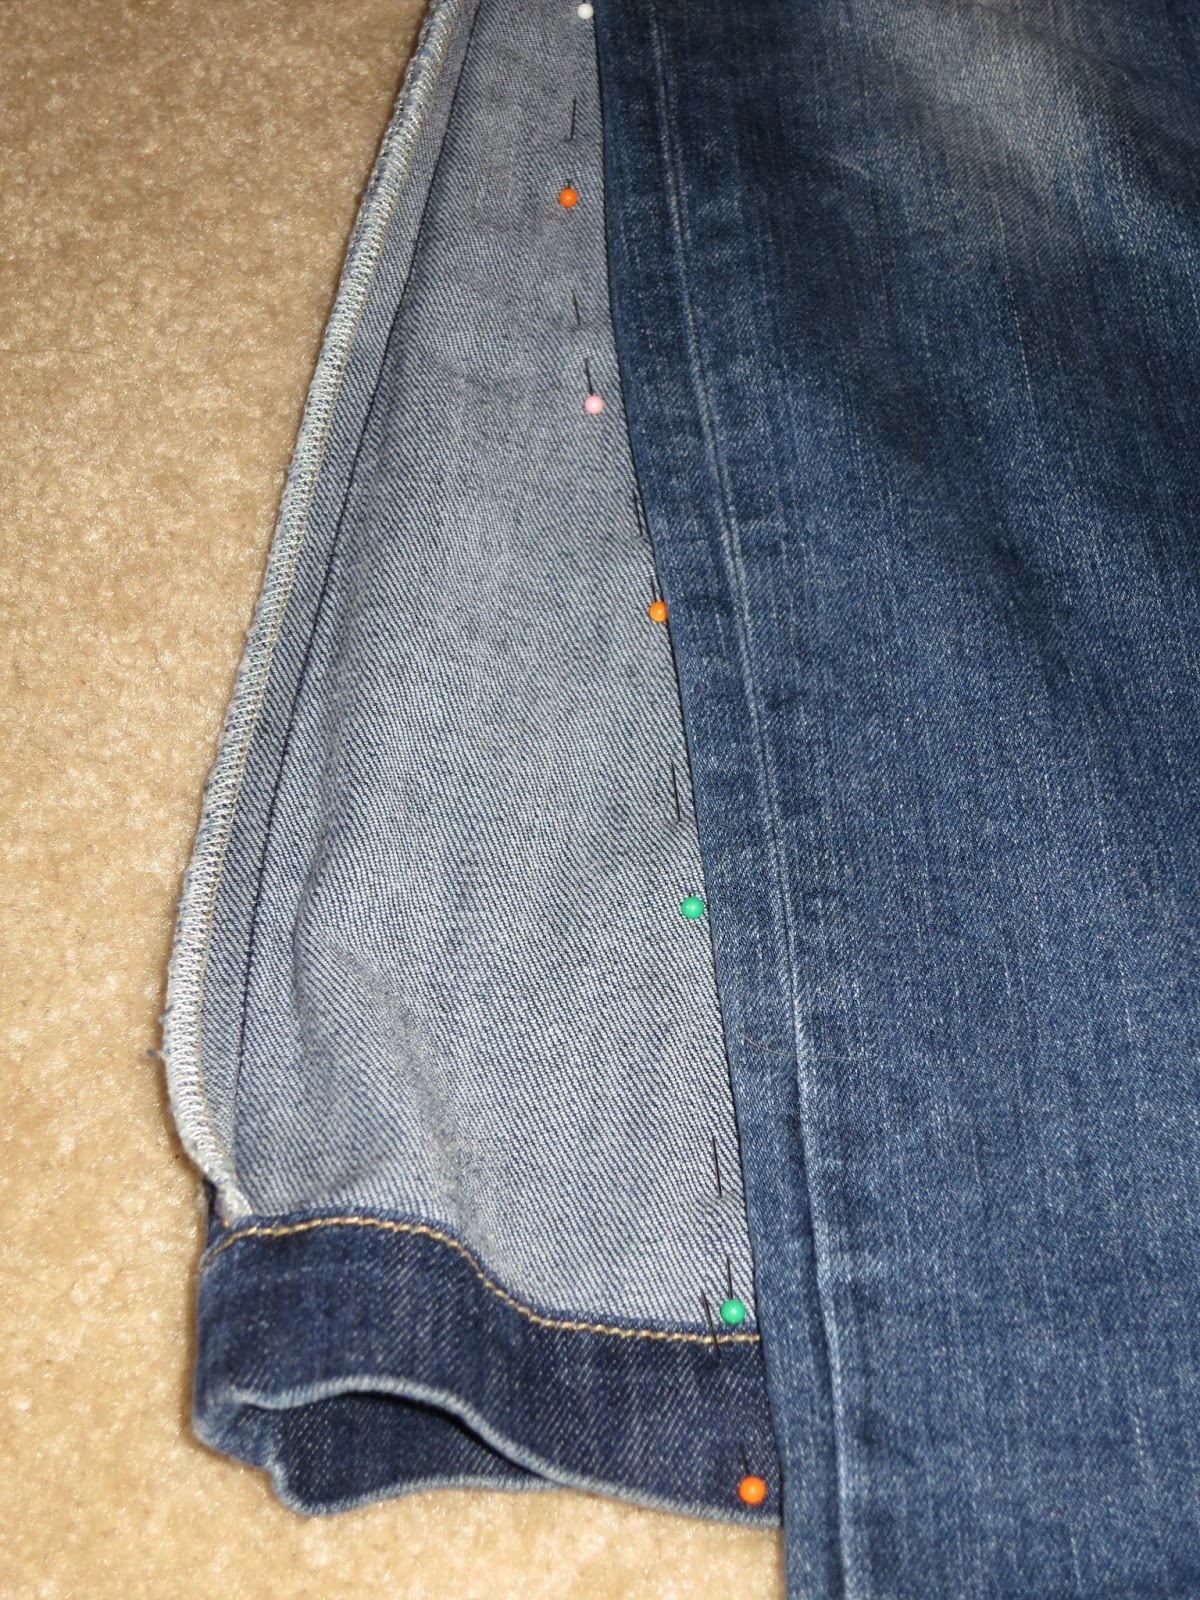
First, I turned my old baggy jeans inside out and laid my beloved skinnies on top. I lined up the crotch and interior seams of both pairs and pinned along the excess of the bootcut jeans. 


Then, I tried them on inside out with the pins in to make sure I liked the way they fit. I'd post the picture...but it's not pretty.

Next, I used the extra piece of wood that I had from the seat of the chair I made. Yes..it's still sitting in our living room. Even when we clean the living room, it gets put in a specific place.....we've made a special place for our trash. Do we qualify for hoarders yet?

I used the wood as a straight edge and used a sharpie to draw a line along the pins. It's a better visual for sewing and ensuring a straight line. No one wants their inseam to be wonky!


Then, I whipped out the sewing machine. It's kind of boring in my sewing/craft/guest room so I always bring my sewing machine out and sew on the floor. And that's our laundry I'm sitting on. Just keeping it real.


I sewed along the lines and tried them on inside out again to make sure everything still felt right. After I decided they did, I sewed another line of stitching just to give it more support. I'm not looking for ripped jeans during my morning get-my-jeans-on squats. You do them too...don't lie.

Then, I cut the excess off so it wasn't all bulky when I wore them.


Then...ta da!! Jump up and down because it worked!!!


The ankles kind of fit funny so I decided to shorten them a little bit. There is this cool trick where you fold your jeans up into themselves and sew along the fold so that the jeans don't lose their original hem. It's much harder then the tutorial's make it look. I think it's especially that way with skinny jeans because it's so hard to sew the cuffs of skinny jeans w/o sewing the two sides together.  Anyways...I made it work. It is not nearly as pretty as it could be. The stitch line is all over the place and I used green thread...not blue...so it's kind of obvious.  They look fine from far away though.


See how difficult that is???

Not a straight line...not a big deal  
Here they are all finished! I'm wearing them now!! I'm especially excited to have a pair of dark skinny jeans to wear with my boots!


Photo credit to my great blogger husband :)

Wednesday, January 30, 2013

No Shame in this Cone!

My best friend Nikki just recently found out she passed her boards and is officially qualified to be a veterinarian!!!! I am SO proud of her. She has been working so hard since high school to make sure she has been on the right track for this career. Vet school has tested her to the max and she came through it with flying colors!! All she has to do is finish rotations and she graduates from NC State in May as Dr. Schweizer!! Crosby is especially excited to have free consultations...she's so material.

I decided to make a Congratulations Dr. Vet present for Nikki and got inspired by this pillow I saw on Fab.com. But come on...she's going to be making the big bucks here, not me so I decided to make one of my own!! I mean, seriously, can you get more perfect decor for a veterinarian? I'm hoping she likes this pillow and lets me decorate her waiting room one day.

Here's my version. I think it turned out pretty well. I've included a tutorial below so you can read on or not.


Cone of Shame Tutorial: 

First Step, find a dog! The Fab one looks like a dachsund but after googling some silhouettes, all of the dachsunds looked sick or weird. Nikki's dog is part maltese and part beagle, so I changed my search to beagle silhouettes and found a great one. Print it out as big as you want. I wanted it pretty big so I opened up the picture in excel and printed from there. That created a 4 page puzzle I just had to cut out and piece together with some tape.


I used felt for the dog and the cone. That way I didn't have to mess with hemming it and also didn't have to worry about the edges fraying. Use a silver sharpie or light colored pen and trace out your shape on the back of your felt. Before you do this step, figure out which way you want your dog facing on the pillow. Trace your dog facing the opposite way on the felt so when you cut it out, you can flip it and it won't show your sharpie marks. Then cut that pooch out! Use sharp scissors or short strokes so the felt doesn't stretch or warp.

Once your dog is cut out, it's time to make the cone. This was the most difficult part because I couldn't get over the shame the shape I wanted. What I ended up doing was holding my felt up to the computer screen and tracing it directly off of the fab.com pillow. This created the right angles. Then I just eyeballed it and scaled the size up about 2x. You'll need two parts for the cone...the front that will go on top of the dog, and a small sliver that goes behind the dog to create the back of the cone.


Try it on your dog and make sure the scale is right. A chihuahua will wear a different size then a great dane so scale appropriately.


Now you need to cut out your pillow pieces. Nikki had some old pillows she wasn't crazy about so she gave them to me to re-cover. I took the cover off and used it as my guide so I could get the same size. I also ran an iron over my fabric after cutting out the pieces so my finished pillow wasn't wrinkled.


Now, it's time to whip out your sewing machine. I would definitely recommend pinning your dog down. My pillow fabric was slippery and the felt doesn't give much so it's very easy for your shape to get crooked if it's not pinned down. When you place your pup, give enough room around the edges of the pillow to account for the seams of the pillow. At least 1 inch from the edge should do it, but give it more if you don't want it starting right at the edge of your pillow.

Also, you'll want to go ahead and place the small sliver of the back of your cone behind the dog's head. You'll just sew right over it, but test out the angle with the other piece of the cone when you pin it down to make sure it's how you want it. Also, make sure your thread matches your dog or you'll see your stitch line all the way around.


Now, change your thread to match the color of your cone and pin the top of your cone into place. You'll want to overlap it with the back sliver just barely. This makes it connect and also gives it a 3-D look.


Then just sew around the edges of the cone. Go all the way around the front piece of your cone and along the edges of the back piece. Every edge of white should be sewn down.

Now, get the other side of your pillow and put the front sides together, pin around the entire pillow and sew. Leave a 4-5 inch gap on one side for your stuffing. I did two rows of stitching around the edge of the pillow for extra stability. Here's my finished pillow cover after sewing and turning the pillow right-side-out.


Here are the old pillows and the stuffing I was re-using. You could also use new batting or an already made pillow.


Stuff that pillow up and beat it flat! Mine was super lumpy so it took some extra beating to get it normal-ish. The last step is hand sewing the gap that you left in the bottom to insert the stuffing. It was at this point that I realized I don't have a hand sewing needle!!! I can't believe it! I was so anxious to finish, I ended up sewing it on the machine and it actually turned out really great, so if you do it that way, it can work! I didn't take a picture of it though....It's just a boring seam.

Anyways, here is the final product again! I'm so pleased with how it turned out and I can't wait to give it to Nikki! I hope she loves it. Now I need to try to figure out how to do our pup Crosby!


Tuesday, January 29, 2013

Coffee Table Update

I've been perusing Craigslist for the last few weeks for a new coffee table. Here's our old one:


It was a hand-me down from my parents when they decorated our apartment after the wedding and it's served us well up to this point. But, because of the glass top, it was always smudgy. Plus I wanted something with a little bit of storage so we didn't have remotes and papers all over it all the time. It's only cleaned off in this picture because this was the picture I took to sell it on Craigslist. The other bad thing about this one was that Derrick and I are feet-on-the-coffee-table people and sometimes during a particularly frustrating NC State game, we'd push off of the coffee table, raise the glass up on one end and have it crash back into place. I was sure it was going to shatter one of these days.

So I searched that list that dear old Craig keeps until I found a bargain! We wanted a nice piece of furniture that was sturdy and looked a little more expensive then your generic college dorm room coffee table. Our college days are sadly getting farther and farther away. I did not want to dish out the dollars for something super nice though. I was willing to take a fixer-upper and totally wow you guys with my DIY skills but then I found this baby:


Looking at this picture now, it kind of looks like it has some dings on that closest leg, but it doesn't. At least not that I've noticed. It's sturdy as a rock! Derrick was conveniently out of town for the pick-up so my friend Holly accompanied me to pick it up and keep me safe. She also helped me lug it up the stairs and into the apartment. It was originally listed for $70 but I haggled her down to $60. :)

 There is a lot of brown going on in the living room now but I have plans for that end table!


Here's my favorite part: The remote drawer!! It's awesome...and I'm lame. It's ok, I embrace it.


Mom thinks I sell things to cheaply on Craigslist so before I say how much we got for our old one, here is my disclaimer to my cheap-o ways.

1. Having the item I'm selling gone and not having to waste space with it is more valuable to me then the cash-o-la. Maybe when we have a garage or an extra spare bedroom I'll be willing to hang on to things for a while longer to get more $.  I tend to erratically purge the house of things and Derrick has to step in and be the rational one, so obviously, hoarding is not an issue here. Except for maybe scissors. I have 7 pair in my desk, 3 in the kitchen, 1 in the knife block, 1 in the bathroom, and 1 in the car...........

2. Selling it cheap means it's gone faster!

3. The table was broken. One of the supports along the bottom was completely broken off. You'd have to weld it or gorilla glue the heck out of it to fix it.

I sold it for $25...to a man named Jody...who drove a big white van. I'm glad I made him wait til Derrick returned home before coming to pick it up. It's too classic of a horror story and everybody knows I scare easy.

Friday, January 25, 2013

Frosty Cros

So Derrick just touched down in Daytona Beach, FL earlier today for work and is wearing short sleeves! Meanwhile, all of the Triangle area is shut down with sleet and snow! So...Crosby and I  went out to play :)

For anyone who doesn't know us well....and even if you don't know us well you probably know this, Derrick and I are obsessed with our dog Crosby. She was featured in our engagement pictures, was the subject of our Christmas card, and her name works well as a replacement for any prominent word in any song you might be singing. Try it...you'll see. This post is mainly just pictures of Cros in the snow, so unless you want to see lots of pictures that are essentially the same, you don't have to read the rest.

Except if you're one of Cros' grandmas or grandpa. It's just training for the endless pictures of grandchildren you'll have to look at in fifteen years. You'll be pros by then :)


Fighting the Blizzard

These ducks are CRAZY!


Intensely focused on the Duck dinner she is planning


Iced out...I'll be iced in tomorrow I think
And now Cros is passed out at my feet. She was frozen when we got back in so I threw her in the hot bathtub. That combined with the icy walk conked her out!

Wednesday, January 23, 2013

Sold!!

I feel like a Facebook celebrity! Thanks to everybody for the kind words and "likes" :)

Today I had my first closing as a realtor for Coldwell Banker HPW. It's been an awesome experience! I had the most fantastic clients. Seriously....they were dream buyers. Kari was on my club ultimate team this past year and she and her husband Eugene (also an ultimate player) are expecting their first babies this May. Identical twins!!

Kari emailed me in December to talk about working together on this sale and I couldn't be more thrilled. They found a dream home in Durham, NC with plenty of time to settle in and prepare for their baby boys! I am so glad that they put their faith in me, especially as a new agent. It was a learning experience for all of us. The best part of the entire process was seeing how excited and happy they were at closing this morning. It made me feel so great that I could be a part of that. I think I've definitely found a career I can live with!

Congratulations Kari and Eugene!! 


Tuesday, January 22, 2013

Cord Storage...Corage...Cordage...Stordage

Two posts in one day...what??

So I've been really annoyed with our home office/guest room recently. It's turned into our dumping ground..especially after Christmas. So, that room became a main focus of mine during my organizational mid-twenties crises. I'll get more into it later, but for now, I wanted to show off my awesome cord storage solution! We have lots of random cords for charging things and connecting cameras to the computer. I'm notorious for never knowing where the cord I need is. One of the reasons Derrick chose the camera he got me for Christmas is because the cord is pretty generic. I had to buy a new one for my old camera almost every time I wanted to put pictures on the computer....not cool.

So, to wrangle all these annoying cords I made a cord box!


I had this old picture/filing box laying around. I've had it for years and it's just tagged along with every move I make. I decided to upcycle it from junk holder to cord organizing extraordinaire!

All I did was take a couple pizza boxes from our recycling bin and created some fancy schmancy dividers.


Then I just covered the ugly cardboard with some extra scrapbook paper I had lying around and Ta-Da!! Now there is a space for every cord! And it's labeled! Oh..and Santa? I want a label maker next year :) Thanks Big Guy!


Now if only something to store extension cords and surge protectors could be so cute.

New Real Estate Blog!

So I've expanded my blogging into Real Estate. It is going to be almost entirely about Real Estate and it even gets auto-filled with canned articles every few days. It's nice because it's low maintenance, but I'm going to be putting my own posts on their pretty regularly and once I start to get really busy, I'll hopefully eliminate the auto-filling all together. I want to try to infuse some of my personality into it while still keeping it professional. I mean..let's be serious..I don't think a post called Yellow Snow is going to cut it in the professional world! Any potential client would take one look and head for the door! Unless of course they too have snow-loving-yellow-snow producers.  Maybe it's worth it for that 1 in a million....

Anyways, the real estate blog is: blog.lauriemarcey.com . You can copy and paste that link or you can look right over here ---------------------------------------------------------------------------------------------------------> and you'll see it on my blog roll. See it? Down and to the right? It's called Triangle Real Estate Blog. It will be moved to the top anytime I update it.

I think you'll be able to tell the canned posts from the Laurie posts. Although, I do go in and edit the canned posts so they don't sound so stuffy sometimes :)

Happy Reading!