Friday, October 18, 2013
Monday, October 14, 2013
Parade of Homes 2013
On Sunday I dragged Derrick all over Cary to see the Wake County Parade of Homes. I didn't actually drag him. He put on a brave face and appeared happy to visit 9 gorgeous new homes. The Parade of Homes is a builder showcase. This year there are 190 parade homes that various builders have built around the Triangle and they are opened up during the month of October for anyone to go through and Ooooo and Ahhhhh at the gorgeousness of these homes. If you haven't had a chance to take a tour, click on the link above and map out a route for this weekend. It's the last weekend the parade is open and it's open from 12:00-5:00 Saturday and Sunday. All of the homes are absolutely gorgeous and they range in price range from around $130K to 2.5 million!
Derrick and I were able to visit 9 homes in 3 hours on Sunday and these were big homes, so each one took a lot of poking around to get through them. We chose the ones closest to our apartment and I think the farthest from our apartment we got was about 5 miles and we didn't even hit them all. The new communities are usually nice and close and it made for a really fun date day! I see a lot of homes in my career, but Derrick and I haven't started any serious house hunting together so it's fun to walk through and daydream about what we like and what we don't like and what we'll only dream about affording one day.....i.e. million dollar house!
Here's a quick tour for you through the homes we got a chance to check out! The first one we checked out was completely adorable but of course I forgot pictures of the inside. It's in Kitt's Creek in Morrisville. It has a cool floorplan with two staircases. The back staircase led to a perfect guest room getaway! I loved the curb appeal of this one and it felt a lot larger inside then it looks from the outside. It's built by Lennar.
.jpg)
Next we hopped down further into Kitt's Creek and found this one literally less then a minute down the road. Built by Revolution Homes, this baby had six bedrooms and two bonus rooms!! I don't think Derrick and I will ever need that many rooms, but it would be perfect for a large family! The neighborhood has a pool and a playground too!

Look at that kitchen!! That island is almost as big as my bed...maybe bigger!
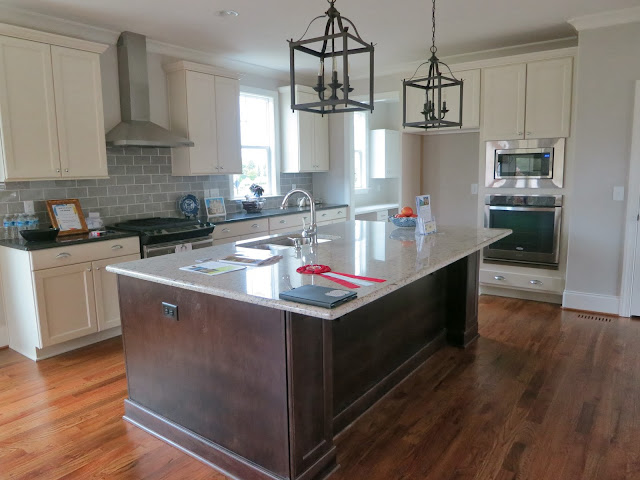
The next stop was just down the road, only about three minutes from Derrick and my current apartment and was one of Derrick's favorites of the tour. It was built by Walker Design Build.

Check out the stone detail in the kitchen. White kitchens are so popular right now that I thought it was nice to see a gorgeous darker toned kitchen.

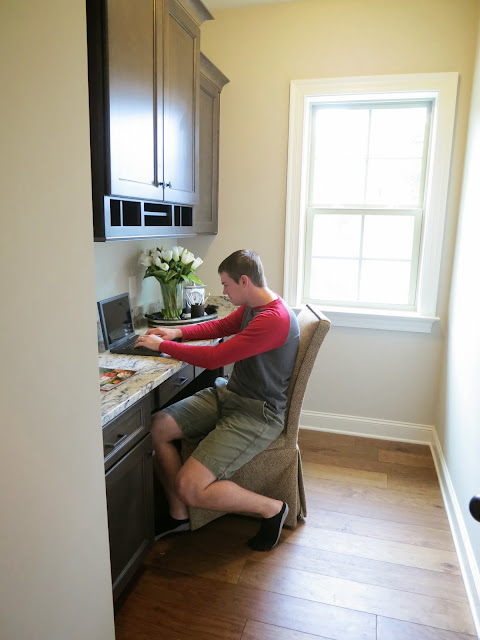
And this...I LOVE! We saw a couple of these on the tour and I love the new trend. It's a small office, probably 10x8. It's the perfect use of space and I flipped out over it.


This one had my favorite closet, hands down! It was a total surprise and I'm pretty sure I screamed a little bit.

Derrick doesn't even know what to think about it. I think this was his face when I told him I'd have to buy more clothes to fill it up once we bought this house :)

Hahaha....oh yeah. And this house had this in the kids bathroom.

Ooooo....here is one of my favorites of the tour. It's the Miracle home built by Terramor Homes. They came to our office and told us about it and I was excited to see it in person. They got donations for items throughout the house and when it sold, they donated money to the Duke Children's Hospital. If I remember correctly, they had raised $100,000.00 for the children's hospital.


Another little desk nook! It's only as wide as you see here. I think it's perfect!
Next, we headed over to The Peninsula at Amberly to view a home built by Royal Oaks Building Group. It was really crowded and I was busy taking mints out of the free mints jar so I unfortunately didn't get any interior pictures, although Derrick and I both agreed the floorplan was fantastic. Here's a picture of the front.
.jpeg)
Next, we headed up the road to a home built by Baker Residential of the Carolinas. The most stand out feature of this home was the eat in kitchen. The kitchen itself was very grand, but the eat-in portion of it could have fit a table that seats 20. It was huge!


Next it was on to the million dollar home. It was built by Wardson Construction and was as spectacular as you would expect at that price point! Look at this gorgeous ceiling! It had the best yard that we saw. I wish I had gotten a picture of it!


We were running out of steam by this point so chose two more to stop by that were on the way home. This was a really cute one built by Standard Pacific Homes. It was tall and skinny but didn't feel that way once you were inside.

It had an adorable office. You can opt out of the built-ins and this can be a formal dining room if you prefer that, though there is a great eating area right next to the kitchen. I think this tour made me realize my over-the-top love of cute offices. Like mine would ever look that clean...

Last, but not least! we stopped by a townhouse built by M/I homes. This one felt detached, and actually Derrick and I didn't know it was attached until we took another look at it outside. It's only attached by the storage unit in the back. No living walls are connected to the neighboring house.

Can't get enough of these gorgeous kitchens!

I really liked the paint treatment in the master bedroom!

This was my first Parade of Homes and I loved it! It's so fun to see all of the gorgeously decorated homes! I would totally recommend it to anyone in town next weekend!
Derrick and I were able to visit 9 homes in 3 hours on Sunday and these were big homes, so each one took a lot of poking around to get through them. We chose the ones closest to our apartment and I think the farthest from our apartment we got was about 5 miles and we didn't even hit them all. The new communities are usually nice and close and it made for a really fun date day! I see a lot of homes in my career, but Derrick and I haven't started any serious house hunting together so it's fun to walk through and daydream about what we like and what we don't like and what we'll only dream about affording one day.....i.e. million dollar house!
Here's a quick tour for you through the homes we got a chance to check out! The first one we checked out was completely adorable but of course I forgot pictures of the inside. It's in Kitt's Creek in Morrisville. It has a cool floorplan with two staircases. The back staircase led to a perfect guest room getaway! I loved the curb appeal of this one and it felt a lot larger inside then it looks from the outside. It's built by Lennar.
.jpg)
Next we hopped down further into Kitt's Creek and found this one literally less then a minute down the road. Built by Revolution Homes, this baby had six bedrooms and two bonus rooms!! I don't think Derrick and I will ever need that many rooms, but it would be perfect for a large family! The neighborhood has a pool and a playground too!


Check out the stone detail in the kitchen. White kitchens are so popular right now that I thought it was nice to see a gorgeous darker toned kitchen.


This one had my favorite closet, hands down! It was a total surprise and I'm pretty sure I screamed a little bit.

Derrick doesn't even know what to think about it. I think this was his face when I told him I'd have to buy more clothes to fill it up once we bought this house :)


Ooooo....here is one of my favorites of the tour. It's the Miracle home built by Terramor Homes. They came to our office and told us about it and I was excited to see it in person. They got donations for items throughout the house and when it sold, they donated money to the Duke Children's Hospital. If I remember correctly, they had raised $100,000.00 for the children's hospital.


Another little desk nook! It's only as wide as you see here. I think it's perfect!

.jpeg)
Next, we headed up the road to a home built by Baker Residential of the Carolinas. The most stand out feature of this home was the eat in kitchen. The kitchen itself was very grand, but the eat-in portion of it could have fit a table that seats 20. It was huge!


Next it was on to the million dollar home. It was built by Wardson Construction and was as spectacular as you would expect at that price point! Look at this gorgeous ceiling! It had the best yard that we saw. I wish I had gotten a picture of it!


It had an adorable office. You can opt out of the built-ins and this can be a formal dining room if you prefer that, though there is a great eating area right next to the kitchen. I think this tour made me realize my over-the-top love of cute offices. Like mine would ever look that clean...

Last, but not least! we stopped by a townhouse built by M/I homes. This one felt detached, and actually Derrick and I didn't know it was attached until we took another look at it outside. It's only attached by the storage unit in the back. No living walls are connected to the neighboring house.

Can't get enough of these gorgeous kitchens!


Sunday, October 13, 2013
Finally....5 Years Later!
Warning: PICTURE OVERLOAD!
Derrick and I have been together for 5 Octobers. That's kind of crazy to think about. I've told him every year that I want to go to a corn maze. He finally took me!! 5 years later!! I found a groupon for a dog-friendly corn maze in Archdale, NC. Archdale?? Yeah, that's what we said. But it was dog-friendly so it was a no-brainer. The groupon was for 4 people so we invited our pals Jeff and Courtney along and their Golden Retriever Lucy. It was everything I had ever dreamed of!

There were families with actual children waiting in line behind us to pose on these giant pumpkins :)

This is probably my favorite picture of the weekend and it's because of Lucy.


So, Farmer Joe is missing and there are 7 animal suspects, 7 weapons, and 7 locations. You have to find 6 checkpoints throughout the maze and each one will rule out a suspect, a weapon, and a location. Can you solve the mystery? It was the goat...obviously.

This is what the maze looks like from above. They use GPS-navigated plows to plow out the image. Pretty cool.

She just barely made it.


After the maze we took a tractor ride around the property and learned about how they made the maze.

Crosby was not OK seeing the ground move underneath her feet. She almost pulled herself out of her collar and jumped off so she sat on my lap for the whole ride.


Lucy loved it though!


Lucy is one of our favorite friend's dogs because she's hilarious.


A 5-year wait was totally worth it, but now that I know what I'm missing, Derrick's not going to get away with another 5 years until our next visit!
Thursday, October 10, 2013
Signs of a Good Week
It's been a good week.
I've seen my best friend a lot this week and it's been great. We sometimes go a couple weeks without seeing each other or exchanging more then a few texts, and then we have weeks where we see each other everyday. It's how we work and we are both OK with it. I've seen Nikki everyday this week and have plans to see her tonight too.
Nikki has been taking care of Steve and Somer's pup Kiwi this week. She is high energy and requires lots of exercise so I picked her up one day while Nikki was working and tired her out. She and Cros even get along which is an added bonus. Here's Crosby teaching Kiwi that the bridge is not in fact terrifying.

I received an award at work this week! And, despite it looking like a terrific kid award with some Microsoft Office clip art, it's actually a pretty big deal. I got the rising start award for September which means I had the best September out of all of the agents in my office within their first 12 months of business. My Mom gasped and oooed and ahhhed :) Such a good Mom.

I finished my dining room chairs! The living room was a wrecking zone during this project. Derrick told me "these are the times when you should be happy that a messy house doesn't bother me."

I worked on several projects for Nikki and Justin's impending Harry Potter engagement party. It's going to be epic! Crosby helped too.

And tonight Nikki, Claire, and I are taking a walk around Lake Lynn. We will be out numbered by dogs and it will probably be raining. I'm planning on breaking out my winter boots because it's freezing!!!
Hope you all had a great week too!
I've seen my best friend a lot this week and it's been great. We sometimes go a couple weeks without seeing each other or exchanging more then a few texts, and then we have weeks where we see each other everyday. It's how we work and we are both OK with it. I've seen Nikki everyday this week and have plans to see her tonight too.
Nikki has been taking care of Steve and Somer's pup Kiwi this week. She is high energy and requires lots of exercise so I picked her up one day while Nikki was working and tired her out. She and Cros even get along which is an added bonus. Here's Crosby teaching Kiwi that the bridge is not in fact terrifying.

I received an award at work this week! And, despite it looking like a terrific kid award with some Microsoft Office clip art, it's actually a pretty big deal. I got the rising start award for September which means I had the best September out of all of the agents in my office within their first 12 months of business. My Mom gasped and oooed and ahhhed :) Such a good Mom.

I finished my dining room chairs! The living room was a wrecking zone during this project. Derrick told me "these are the times when you should be happy that a messy house doesn't bother me."

I worked on several projects for Nikki and Justin's impending Harry Potter engagement party. It's going to be epic! Crosby helped too.

And last night, Derrick and I joined several friends at Trivia. We haven't been to Trivia in a long time. We were teamed up with Courtney, Jeff, Justin, and Nikki and we were tied for 1st going into the last round. This form of trivia is really fun...you wager points based on how confident in your answer you are. We ended up wagering it all and missing the last question!! I don't know where we ended up, but we didn't place. It was a fun night though.
And tonight Nikki, Claire, and I are taking a walk around Lake Lynn. We will be out numbered by dogs and it will probably be raining. I'm planning on breaking out my winter boots because it's freezing!!!
Hope you all had a great week too!
Saturday, October 5, 2013
Spoke too Soon
Remember 24 hours ago when I told you I was going to move ahead with my fabric on my $15 thrift store wingback chair? Yeah, within an hour of posting that I was second guessing myself. I just thought the giant print would be too much on a chair with that much fabric. There was nothing to break it up and I was just having doubts. One of my best friends, Alison, is a sounding board for lots of my fabric-y projects because she is a fantastic sewer and has a great eye. She was the one that originally told me she wasn't so sure about that fabric on the wingback and I'm so glad she did. I was talking to her today, and she suggested using it on my dining room chairs! Why didn't I think of that????
Remember way back when we got married and our parents housecrashed our apartment while we were living it up in Jamaica and put our entire apartment together? Best present ever! Well, they also surprised us by getting our dining room chairs reupholstered. They were a coffee color and looked like they belonged in a doctors office. Well.....I loved the thought of it, but I didn't quite fall head over heels for the fabric. It was a fantastic upgrade to what was there, but something just didn't jive with me. Don't worry...I called Mom before I took this project on to make sure I wouldn't hurt her feelings. Mom and Dad are the best. They just want us to be happy and Mom was in no way offended :)
So...Here's where we started. Cute right? But I'm high maintenance. I know it, Derrick knows it. Not high maintenance in the sense that I take forever to get ready in the morning (serioulsy...Derrick has to remind me to shower...) but high maintenance in the fact that I know what I like and what I don't and I haven't quite mastered the art of subtlety.

This was a learn as you go project which should be no surprise. At this stage of my reupholstery life, this is only the second project I've taken on. It really is easy though and if I can do it, you can do it!
First step is taking it apart. I started with the seat because seats are easy and the way it was put together was very straight forward. See those pins with the screws? That's all that's holding the seat in place and there was one in each corner.

Just unscrew those screws from the pins and your seat pops right off. Easy peasy!

Next I studied the back of the seat. It looked pretty straight forward. I'd never seen that black plastic used before but I made sure to save it and reuse it. I think it's purpose is just to cover up the raw edges of the fabric to make it look more finished and also to avoid fraying.

First step is taking out the staples. You cannot live without needle nose pliers and a flat head screw driver during this phase. Also, it helps to have Say Yes to the Dress on in the background because you're going to be here a while. Take the staples out that are holding the black plastic and then get to work on the fabric. You can also see in the picture below that I labeled where the screw holes were and which was the front and back of the seat.
This step is not necessary, but probably helpful. How do I know it's not necessary? After I recovered it with my fabric I couldn't see my screw marks and after putting the seat back in place, I realized I mixed up the front and back labels. So....yeah.

I decided to reuse the batting because it was in perfectly good condition so I just peeled the fabric off of the batting. Now..reassembly time.

I used the fabric I pulled off the seat as a pattern. If you have a patterned fabric, make sure you pay attention to the direction it is going and how you want it to go on the chair. I cut my fabric about an inch larger on each side. I don't really know why...I just wanted to make sure it wasn't too small and you can always trim it up later. I also went ahead and cut out the fabric for the other 3 chairs while I was at it so I could iron them all at once.

Once your fabric is ironed, lay your seat on the backside of the fabric and center it. I just put four staples in at first to make sure the pattern was nice and straight. You want to pull it nice and tight. I stapled all the way around except for the corners.

Once you have everything stapled but the corners, just fiddle around with them until each corner looks pretty. Then the seat is done! This next part was something I have never done before. The top part of the chair is held in place by hidden screws. See those dark circles on the side of the chair? That's wood putty hiding the screws. I googled around and there are different types of wood putty and different ways to remove it. I got lucky that mine was still pretty soft, so I just carved it out with a pair of scissors. I laid the old seat fabric under the chair though because that stuff will make a mess.


Once you get all four puttied holes cleaned out you just unscrew the top.


This is where I was able to see exactly how this was put together. The fabric is a big rectangle that is folded over the top of the chair so it looks nice and clean, but stapled along the bottom because you can't see that once is't reassembled. It's also got staples along each side edge that sits flush with the sides of the chair so those staples are hidden as well. Just take all those staples out along each edge to remove the fabric.

Here is a shot of what the fabric looked like when my parents recovered it. Whoever reupholstered it just decided to reupholster it over the existing fabric. I decided to remove the green and yellow fabric 1. because my fabric has some white in it and I didn't want the old fabric to show through and 2. because there were so many staples in it, I wasn't sure I could staple even more in successfully. I did, however, reupholster right over this coffee colored fabric. I figured if it had been done before, it would be fine this time.

Tuck and staple and work the fabric til it's nice and tight. Then just reassemble it, putting the screws through the now open puttied holes and back into the chair. One of my screw holes was stripped and it was making the top of my chair wobbly. I'm not sure how this worked but it did. I put some hot glue down the hole and waited for it to harden and then just screwed into the hot glue...It worked and I felt like a genius. Here's the finished chair!

Three more to go!
Remember way back when we got married and our parents housecrashed our apartment while we were living it up in Jamaica and put our entire apartment together? Best present ever! Well, they also surprised us by getting our dining room chairs reupholstered. They were a coffee color and looked like they belonged in a doctors office. Well.....I loved the thought of it, but I didn't quite fall head over heels for the fabric. It was a fantastic upgrade to what was there, but something just didn't jive with me. Don't worry...I called Mom before I took this project on to make sure I wouldn't hurt her feelings. Mom and Dad are the best. They just want us to be happy and Mom was in no way offended :)
So...Here's where we started. Cute right? But I'm high maintenance. I know it, Derrick knows it. Not high maintenance in the sense that I take forever to get ready in the morning (serioulsy...Derrick has to remind me to shower...) but high maintenance in the fact that I know what I like and what I don't and I haven't quite mastered the art of subtlety.

This was a learn as you go project which should be no surprise. At this stage of my reupholstery life, this is only the second project I've taken on. It really is easy though and if I can do it, you can do it!
First step is taking it apart. I started with the seat because seats are easy and the way it was put together was very straight forward. See those pins with the screws? That's all that's holding the seat in place and there was one in each corner.

Just unscrew those screws from the pins and your seat pops right off. Easy peasy!

Next I studied the back of the seat. It looked pretty straight forward. I'd never seen that black plastic used before but I made sure to save it and reuse it. I think it's purpose is just to cover up the raw edges of the fabric to make it look more finished and also to avoid fraying.

First step is taking out the staples. You cannot live without needle nose pliers and a flat head screw driver during this phase. Also, it helps to have Say Yes to the Dress on in the background because you're going to be here a while. Take the staples out that are holding the black plastic and then get to work on the fabric. You can also see in the picture below that I labeled where the screw holes were and which was the front and back of the seat.
This step is not necessary, but probably helpful. How do I know it's not necessary? After I recovered it with my fabric I couldn't see my screw marks and after putting the seat back in place, I realized I mixed up the front and back labels. So....yeah.

I decided to reuse the batting because it was in perfectly good condition so I just peeled the fabric off of the batting. Now..reassembly time.

I used the fabric I pulled off the seat as a pattern. If you have a patterned fabric, make sure you pay attention to the direction it is going and how you want it to go on the chair. I cut my fabric about an inch larger on each side. I don't really know why...I just wanted to make sure it wasn't too small and you can always trim it up later. I also went ahead and cut out the fabric for the other 3 chairs while I was at it so I could iron them all at once.

Once your fabric is ironed, lay your seat on the backside of the fabric and center it. I just put four staples in at first to make sure the pattern was nice and straight. You want to pull it nice and tight. I stapled all the way around except for the corners.

Once you have everything stapled but the corners, just fiddle around with them until each corner looks pretty. Then the seat is done! This next part was something I have never done before. The top part of the chair is held in place by hidden screws. See those dark circles on the side of the chair? That's wood putty hiding the screws. I googled around and there are different types of wood putty and different ways to remove it. I got lucky that mine was still pretty soft, so I just carved it out with a pair of scissors. I laid the old seat fabric under the chair though because that stuff will make a mess.


In this shot you can see the screw hiding in there.

Once you get all four puttied holes cleaned out you just unscrew the top.


This is where I was able to see exactly how this was put together. The fabric is a big rectangle that is folded over the top of the chair so it looks nice and clean, but stapled along the bottom because you can't see that once is't reassembled. It's also got staples along each side edge that sits flush with the sides of the chair so those staples are hidden as well. Just take all those staples out along each edge to remove the fabric.

Here is a shot of what the fabric looked like when my parents recovered it. Whoever reupholstered it just decided to reupholster it over the existing fabric. I decided to remove the green and yellow fabric 1. because my fabric has some white in it and I didn't want the old fabric to show through and 2. because there were so many staples in it, I wasn't sure I could staple even more in successfully. I did, however, reupholster right over this coffee colored fabric. I figured if it had been done before, it would be fine this time.

Tuck and staple and work the fabric til it's nice and tight. Then just reassemble it, putting the screws through the now open puttied holes and back into the chair. One of my screw holes was stripped and it was making the top of my chair wobbly. I'm not sure how this worked but it did. I put some hot glue down the hole and waited for it to harden and then just screwed into the hot glue...It worked and I felt like a genius. Here's the finished chair!

Three more to go!
Subscribe to:
Posts (Atom)